I made quite a few alterations to the Elegant Oriole kit! I thought folks might be interested in a labeled photo indicating the stitches I used. It’s practically a sampler.
I’ve decided I adore Cretan stitch, but I definitely need more practice with it. You can get a variety of effects depending on how you spread the stitch out, and I’d like to play around some so I can control which effect I get. At the moment it tends to wobble around a bit.
I’m also a huge fan of the layered lazy daisy stitches in the bottom blue-purple flower – I’ve used them before and they always look fantastic. Portuguese stem stitch (the brown branches) is another stunning stitch that’s fairly easy to pick up.
For reference, here’s the unlabeled photo of the finished piece:
Next I added in the branches in Portuguese stem stitch. I love the texture. It makes a bold twisted line, very branchlike. For the second red flower I decided to try out something different. For the last two flowers I changed colors entirely: I ran out of red for the kit, my friend isn’t fond of pink, and I like blue and purple.
I’ve been working on a secret project! I worked up a modified version of the quick 5×7 inch crewel kit Elegant Oriole, from Dimensions (it’s about $9). It’s a graduation present for a friend of mine. I gave it to her Monday, so now I can post pictures! I took photos as I went along, so you can see my progress. Here is the stitching for the bird:
As you can see, the bird is mostly worked with long and short stitch in wool. The legs are outlined with back-stitch in brown floss. The beak is also brown floss. The top red flower is padded satin stitch, and its leaves are fly stitch.
This is a review of Embroidery designs from the sea, by Barbara Snook. Taplinger Publishing Company, New York, 1977. ISBN 0-8008-2403-2.
Embroidery designs from the sea is an inspirational design book – it is definitely not a step-by-step embroidery book, and does not contain designs or instructions for finished pieces. Instead, it provides fantastic, wonderful sketches of all kinds of sea life, suitable for adaptation to embroidery. It provides ideas and suggestions for stitches to use and possibilities for incorporating these sketches into a final design. Barbara Snook also provides some photos of her work and discusses her creative process.
I love flipping through this book – for instance, there are 6 different sketches of jellyfish (describing 3 species). There are all kinds of creatures in this book, from plankton to limpets to sea horses to many different crab species. So if you’re looking for interesting sketches to get your creativity flowing, this is a really great book. Just don’t expect it to be a step-by-step project book or basic introduction to embroidery. I’ve included a couple of excerpts from this really fun book.
I’ve been visiting my grandparents, so I have photos of more treasures to show you! My great-great-great-grandmother made this hardanger table runner in 1910. It’s a hundred years old! Here it is lying flat:
I couldn’t get the camera to focus well on the entire runner, so here are a couple of closeup photos where you can see the design.
And finally, here is a closeup shot where the stitching is visible:
You can find more resources for hardanger embroidery (tutorials, free designs,and kits) in previous posts in my hardanger embroidery category.
I’m traveling, y’all, that’s why my posting is off schedule.
I resolved my trunk color debate: I am keeping the gray tones (dark, medium, light), but I switched to a darker gray for the shaded side of the trunk. I think the darker color on the left side of the trunk is a real improvement. I added the pink and purple flower on the lower left, too.
Now I have a new color decision to make. See the flower clusters with the petals done in buttonhole stitch with tan floss? I’m debating what color to make the top. I started with dark reddish-brown in satin stitch, but I’m not sure I like that. I could use dark ochre (the next photo). Or the orange color I used earlier. Or the brown in the last photo. Or some other color entirely! I could also replace the tan petals with another color, but I’d prefer not to pull stitches out. What do y’all think? Ideas?
The picture below shows the Kaaba in Mecca, Saudi Arabia. The Kaaba (Arabic: الكعبة) is a cube-shaped building in Mecca, Saudi Arabia, and is the most sacred site in Islam. The Qur’an states that the Kaaba was constructed by Abraham and his son Ishmael, after Ishmael had settled in Arabia. The building has a mosque built around it, the Masjid al-Haram. All Muslims around the world face the Kaaba during prayers, no matter where they are (Wikipedia entry).
See the gold lettering on the black cube? That is actually a black silk cover with goldwork calligraphy! You can see the bricks at the bottom under the cover (which is called the Kiswa or Kiswah, كسوة, English spellings of Arabic words are not exact).
From the Wikipedia article on the Kiswah: The Kiswah is draped annually on the 9th day of the month of Dhu al-Hijjah. Every year the old Kiswah is removed, cut into small pieces and gifted to certain individuals, visiting foreign Muslim dignitaries and organizations. The cover is 658m2 and is made of 670kg of silk. The embroidery contains 15kg of gold threads. It consists of 47 pieces of cloth and each piece is 14m long and 101cm wide. The Kiswah is wrapped around the Kaaba and fixed to the ground with copper rings.
I found some photos of the Kiswah being draped over the Kaaba in an online article (it’s in Arabic, but has a lot of very nice photos). The Kaaba is never entirely uncovered during the entire process. The Kiswah costs about 5.3 million dollars, and is replaced every year.
In the photo below, the hand belongs to Fareed, who has been sewing the gold and silver threads into the Kiswa for more than 30 years. Embroidering the Kiswa is extremely prestigious work, and is done entirely by men.
Finally, here is a very detailed documentary (in English) about the making of the Kiswa. It’s really interesting, and covers everything (history, religious background, dyeing, weaving, printing the design, embroidery, installation, etc etc etc). The section on the embroidery part of the process starts at 19 minutes, 40 seconds if you don’t have time for the whole thing. The video of working the goldwork is fascinating.
This is a review of the book Crewel Embroidery, edited by F. Anderson. Octopus Books Limited, London, 1974. ISBN 0-7064-0319-3.
A tip I picked up from this book, which will entertain my fellow Americans no end: remember the rainbow (red, orange, yellow, green, blue, indigo, violet) with the mnemonic Richard Of York Gained Battles In Vain.
Anyway, this book has the usual basic introduction (fabrics, design transfer, stitch diagrams, and so on). The majority of the book consists of 27 patterns for various items (shoulder bag, skirt, curtain, apron, etc.), although you can embroider the designs on something else if you don’t need the item in question. Each section contains the design, a photo of the finished work, a materials list, color and stitch key, general instructions, and advice on making up the suggested item (this advice ranges from useful details to along the lines of “go find a professional upholsterer”). I personally enjoy a number of the designs, and would love to work them myself sometime (of course, some I find uninteresting). I’ve included in the post a few excerpted photos of my favorite designs.
I saw a post about artist Harriet Maxwell on Mr. X Stitch, and just had to pass the word along. She uses an Irish sewing machine to create detailed portraits. Y’all, what is an Irish sewing machine? Is it just from Ireland, or is there something special about it? Google is failing to answer the question.
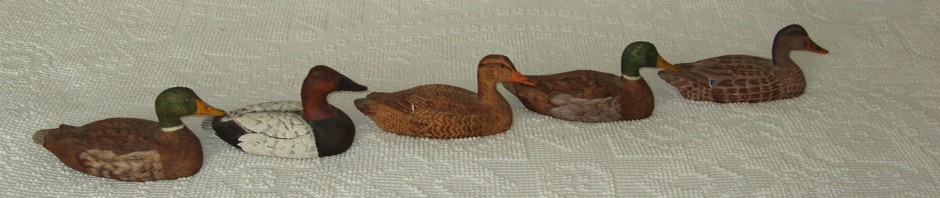
My grandma gave me this tablecloth. Usually when I see embroidered tablecloths, I think to myself “Wow, that is huge and way too much work!” But this one is bright and fun and uses 6 strands of floss, so something similar would work up quickly. I like it a lot, so I took lots of photos.


 Continuing my progress photos from the last post:


 This is a review of Embroidery designs from the sea, by Barbara Snook. Taplinger Publishing Company, New York, 1977. ISBN 0-8008-2403-2.
 I love flipping through this book – for instance, there are 6 different sketches of jellyfish (describing 3 species). There are all kinds of creatures in this book, from plankton to limpets to sea horses to many different crab species. So if you’re looking for interesting sketches to get your creativity flowing, this is a really great book. Just don’t expect it to be a step-by-step project book or basic introduction to embroidery. I’ve included a couple of excerpts from this really fun book.


